This didgeridoo tutorial is both an abridged excerpt from my as-yet-unpublished tutorial manuscript “Urban Didgeridoo” and the first part of a small series in Didgeridoo & Co. Magazine with tutorials on basic techniques. The book is to be published together with a tutorial DVD and in addition to the themes addressed here will contain many exercises for voice use, cheek modulation, “wok” sounds/tongue push, circular breathing, breathing economy, “rhythm building blocks”, overblows and sound links.
For far advanced players there is a large collection of rhythms with “fiddly” techniques (e.g. breakbeats) and many other tips for didgeridoo players on the way to becoming musicians on the plan (e.g. piece building, arrangement, energy development, speech rhythms from various parts of the world, trombone didgeridoo techniques and melody lines, band communication, didgeridoo recording, live technique, stage situation).
In the previous edition, I talked about the basics of diaphragm support/compression and the Embouchure at the mouthpiece. This time we’ll try to make the sound not only louder but also more precise and “sharper”. We’ll deal with probably the most important muscle in didge playing: the TONGUE!
4) didgeridoo tutorial: The Overtones with vowels
“Overtones?” Ring a bell? You’ve probably heard the term. It was in physics, wasn’t it? And then there are these Tibetans … or was it Mongols? … that did overtone singing. At any rate, it’s something mystical, right?
Wrong. Overtones are with us all the time. In fact, without them, you couldn’t even speak normally, much less play the didgeridoo. Every natural tone is a mixture of varyingly high overtone waves. Put pictorially, overtones are the ingredients of a “tonal salad” from which you can “pick them out” again. When you do that, they get “whistlingly” audible above the basic tone. So one doesn’t just play a basic tone, but parallel to it hears the overtones. Higher ones do sound like whistling and deeper ones are more bell-like. Still mystical? Maybe a practical example is helpful.
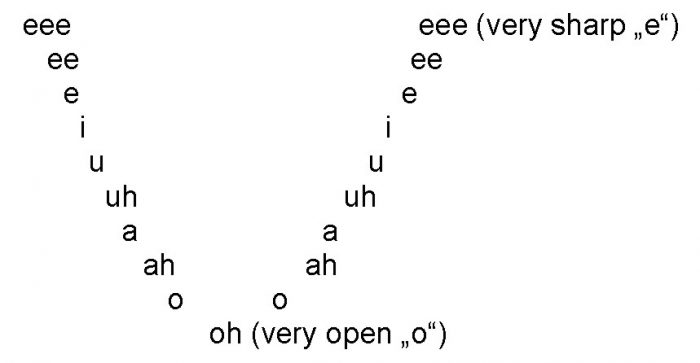
Just whistle any old song you’ve been fond of since you were a child. Say “Waltzing Matilda” or “Yankee Doodle” or “Whisky in the Jar”. Done? That was it. You’ve just produced overtones. Bit unlucky if you can’t whistle. But you can imagine what’s meant, or imitate a wind with “CH”. You’re doing nothing but “modulating out” overtones from a tonal mix. In didging and whistling overtones are produced with the help of vowels (A-E-I-O-U and so”). Feel exactly what happens there. Depending on the melody, the tongue moves from back to front and back. The tip of the tongue is down. The further front the tongue is, the smaller the vibrating air space between the tongue and the lips gets, the shorter the overtone wave oscillates and the higher is the overtone. And because one is so close to the lips, overtones correspond very strongly with the Embouchure at the mouthpiece and especially with the position of the cheeks. With inflated cheeks, an overtone you have formed with your tongue is dissipated in the volume of the cheeks. Therefore: the first rule for clearly high overtones is closed cheeks! (Embouchure E = like empty, even cheeks) Follow it and after a bit of practice you’ll get better and better at making the tone “pointier”, or “sharper”.
To prevent any misunderstanding arising from the start I have to tell you now that the overtones we’ll be dealing with here, the vowels, are only one “kind” of many. As I said, everything that comes into being as sound in a didgeridoo is a mixture of overtones. There are still higher, whirring/buzzing, and still deeper, singing, bell-like ones. There are waftings that, depending on the didge design, are always there and others that only happen when the voice sang and the basic tone overlay each other.
A tip: As beginners, you’ll get the overtones much more easily with a Sharp-edged mouthpiece. Later it probably won’t matter to you.
Exercise 5: Alternating high and low overtone

In this exercise, you move back and forth between a high (“e”) and a deeper (“o”) overtone. Try it first without using the voice because it would only confuse what this exercise is about. Just do it as if you were whispering “oe” or “eo”. If you now want to do that on the didge with base tone, your lips have to be fluttering constantly. Since you are probably used to moving your lips along correspondingly for “e” and “o”, I’ll have to ask you not to do that. Behave like a ventriloquist who moves only his tongue to speak, only whispers and smiles inanely as well (cheeks closed!).
Tip: Being used here for the first time is something that will also be helpful later with rhythm. Start by imagining the combination of letters “into your mouth”. It’ll probably make it easier for you to change between “o” and “e”. You have been able to speak vowels since you were about 1 year old. Feel exactly how with this combination the mouth cavity changes in fast sequences. It often helps if one then simply plays a bit faster (but still penetratingly) and with more compression power. That makes the base tone louder and with it the overtones as well, of course.
Exercise 6: The boomerang

Note: The boomerang will fly an especially beautiful arc if you play every single “ue” accentuated, accelerate and then get slower again. And please don’t count the “ue”s.
Exercise 7: wind

You should first try this exercise without a didge. Only then will it sound like wind. In the didge itself, you can only approximate wind sounds. What you’re doing is playing overtones flowing into each other based on the five vowels and their umlauts, up and down. The tongue stays relatively far forward in the mouth, moves slowly further and further backward, and then back again to the front.
Exercise 8: The staccato wind!

I regard this exercise as especially important because it trains several things together – the quality of the base tone, the Embouchure, vowel overtones, and coordination of tongue and glottis. This exercise “digs” free the tongue’s way forward, as it were.
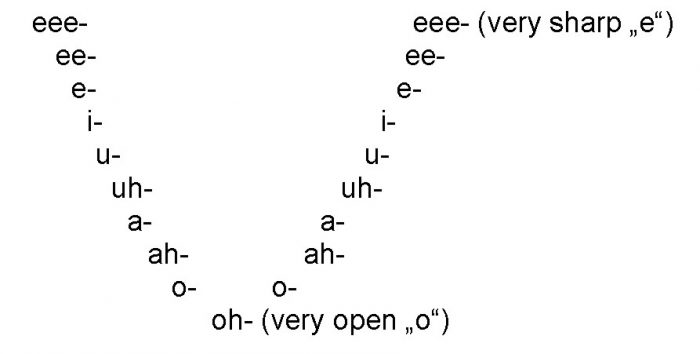
In contrast to the simple wind exercise (above), you now give every single overtone an accentuation with the aid of the glottis. The whole thing is called ‘glottal stop’ and describes the very abrupt opening of the vocal cords. It’s the same as what happens if you cough lightly. That way one can play the individual overtones separately. Although in the didge this no longer sounds like wind, one does hear every single overtone strongly accentuated due to the “coughing”. These equally fast and almost chopped-off accentuations are called “staccato” in music.
It’s important not to do the individual accentuations with the belly, but rather to give out a constant push from the diaphragm (diaphragm support). Nor should you separate the individual overtones from each other with a “d”, so not “dee-de-di-du-do-…”. Perhaps it’ll help you first to speak the vowels without a didge to see how that feels in the larynx and the glottis. Just as good for the right “glottal feeling” is the rhythmic whistling of melodies. Almost the same happens there as does later on the didge. While the position of the tongue changes the height of whistled notes, the opening of the glottis has the effect of separating the notes of the melody from each other. Whistle now as if you were calling a dog: “uueeee-e-e-e-e-e-e-e-e-e … cm’on Fido cm’on” and you’ll be doing exactly what I mean. Now try the “staccato wind” again.
Tip: You should graduate the transitions between the individual vowels/overtones as finely as possible without interrupting. For that, the differences in the tongue movements should be as small as possible. So try to avoid the tongue jumping wildly back and forth like in the first exercise with vowels and overtones.
It’s also good to practice the especially sharp and high overtones for which the tongue is already touching the teeth until the basic tone gets relatively quiet and the overtone is almost the only one still audible. You don’t need this in normal playing, but it does help you to “sharpen up” the tone. And once the tone is sharp and the forward route of the tongue “dug in”, everything “behind it” will also get much clearer.
The “ringing” / deep overtones (500 – 900 Hertz)
In the next step, it makes sense from about “uh” downwards slowly to open the cheeks as well. For that simply try slowly to relax the extreme “grinning position” of the cheeks and lips and just as sensitively allow the cheeks to open. Through the more open cheeks, the deep overtones just sound more sated and produce a more “spatial” listening experience. These deep, spatially effective almost singing overtones can also be described as ringing because they do sound bell-like. Here the tongue doesn’t go as far forward to the teeth for example for the “e”, but stays more in the center to rear area (approximately from “uh” to “oh”) of the mouth. Cautious forward and backsliding of the tongue makes the height of these overtones vary slightly. In my experience, strongly resonant, thin-walled didgeridoos of hardwood, especially those that widen out a bit in the lower part of the upper third, allow these deep overtones to happen a bit more easily and sometimes ring incessantly even if you do not intend to play these vowels.v
More overtone tips
To get clear and beautiful overtones, your lips have to be able to apply themselves optimally to the mouthpiece. I often get the impression that in this the lips are pulled a little into the didge as if they were smithied into it. Minimal changes to the mouthpiece and Embouchure can affect enormous differences in the beginning.
It’s an advantage in overtone modulation to be genetically blessed with a tongue able to curl up the sides. In front of a mirror try to shape your tongue into a long pipe. Won’t work? This anatomical immutability is likely 50/50, but it shouldn’t be a hindrance to playing overtones anyway. It just makes the fine-tuning a bit more precise to start with.
The position of the lower jaw relative to the upper jaw can also serve this end. If, for example, you open the jaw a bit more than usual, something like an “overtone window” opens up. Everything suddenly “sings” more. If you keep the jaw more closed, in fact even gritting the teeth, you get a kind of “hissing” you can use rhythmically or specifically. This hissing consists of a mixture of frequencies between 1,000 and 12,000 Hertz. If at the same time you press your tongue up against the palate (“sh”) the whole thing becomes even more “whirring/buzzing”.
You can often see people with pretty high lip tension losing the base tone after a while. So aim at playing brilliant overtones with relaxed/loose and quiet Embouchure.
5) didgeridoo tutorial: The Oral stops, closure or (ex-) plosive sounds
After we’ve “pointed” the tone as a whole, we now come to a category of sounds that make our playing markedly more rhythmic. They’re called an oral stop or closure sounds, such as “D, T, G, K, B and P”, which play a central part for the didgeridoo as they do in various percussion languages. Why are they called stop sounds? Quite simply because either with the tongue (D, T, G, K) or with the lips (B,P) the exhaled breath is stopped or at least braked and then released again explosively. The excess pressure thus produced creates a short, pressing and pumping sound.
Between the softer (D, G, B) and the harder (T, K, P) stop sounds there is only a graduated difference. The softer ones are voiced whereas the harder ones are unvoiced (the voice comes at the vowel). Depending on how clearly you articulate with your tongue and lips, the more you compress the air the more explosive the sound becomes.
The “B” and “P”
Right at the start, I want to briefly introduce these two “lip stoppers”. They can be used quite well in the didge although, or even maybe because, they briefly stop the lips fluttering and thereby interrupt the base tone. It’s an effect you probably want to avoid to begin with. But say you wanted to work with “Breakbeats”, a playing style with many short rhythmic pauses, and they come back into use. But let’s not get ahead of ourselves here, this will be dealt with in my book. Also in producing the so-called “Overblows”, that is those Alphorn-like overblown sounds that are higher than the base tone, they can be very helpful.
Initially “P” and “B” simply sound like “P” and “B” in the didge. No tricks, no compromises. Except maybe for one: if you play the softer “B” even a lot softer, somewhere between “B” and “W” and somehow add a little pressure, the base tone gets a very characteristic coloration. Just give it a try!
The “D” and “T”
One of the most important sounds of this group is the “D”. And, like “T”,”G” and “K” it also belongs with the tongue closure sounds. Just speak without the voice a very short, percussive “Tu” and feel what that does. The closure with the tip of the tongue at the upper edge of the teeth of the upper jaw, the air stream is first held back. If at the same moment, the belly also pushes, the air is compressed between the diaphragm and tongue. The air thus compressed can be released explosively at any time. Now do the “Tu” once more and move the tip of your tongue back further to the joint between the hard palate (the front part) and the soft palate (the deeper part). Now the compressed air gets more bass, that is it gets deeper (more “Wums”) and corresponds more to a “Du”.
The big advantage of a “D” in rhythmic playing is that you can produce a very fast sound with a good “attack” (sudden, aggressive sound), which you can combine freely with any preferred vowel and many other sounds before and after it without the sound tearing. Most vocalizations used by percussionists to imitate their instruments and to seek understanding about rhythms are based on these tongue closure sounds. In the Indian tablas, for example, it’s in the form of “dhin dhaghena da daghena datige getaka dhin…” or with the conga, for example, it’s “dack kung kung brack!…” And in many Aboriginal languages the “D” plays an important part.
Exercise 9: Tongue with diaphragm kick

It doesn’t matter in this exercise, to begin with whether you do it with or without the voice. Start slowly and support every “Do” with a strong belly thrust. The notation sign for this is the underline, symbolizing the diaphragm. Be aware that your “D” not only breaks the air but that it’s also compressed by a simultaneous belly thrust. Then get faster and faster and constantly push with the belly without giving a “kick” on every “do”. But don’t lose the clear and precise articulation of the “Ds” with the tongue. Then get slower and more powerful again. The faster and jerkier you’re able to do this and the better you coordinate the belly thrust with the tongue closure, the more “cracking” will be the sound coming out of the bottom of the didgeridoo. Didges that put up more back-pressure (catchword “good back-pressure”) are especially good at transporting these sounds. You just do “Du” with your tongue and “BOMB!!!” comes out of the didge. Quite stunning! In contrast to the overtones, you could now work with full cheeks (Embouchure O = like open, blown-out cheeks). The aim is to produce as much pressure as possible in a short time, and the greater air volume of the cheeks is better able to offset this sudden rise in pressure without the lips losing the loose vibration.
Rhythm 1: “Doo”-ing it with the train (4/4)

This exercise is pretty similar to the previous one, except that we now package the whole thing into a rhythmic form. Start counting “1-2-3-4” in a regular rhythm and then start with “Du/Doo” on the “1”. To identify the rhythm accentuation on the “1” I’ve given the “Du” a capital “D”.
Rhythm 2: (4/4)

The challenge in this rhythm is the cheek work. For “Da da” it helps to have them open and at “deyou” we want to hear the overtone, which we best tickle out when we close our cheeks. So the thing to manage is the constant change. In the notation the Embouchure O (open cheeks) is shown with “(..)”-brackets and the Embouchure E (smile) with “|…|”.
Rhythm 3: (3/4)

This rhythm uses the same elements as the previous one, the difference being that we’re now playing a 3/4. We know that one from the waltz: “Rum-tum-tum-Rum-tum-tum-…”. So, the individual cycle goes only through three equal beats before starting over. The “deyou” is shortened and now goes only through one beat, instead of the two before. That leaves you a little less time to close your cheeks.
“G” and “K”
If we now add to our small palette of sounds the other tongue-closure sounds like “G” and “K” we will have, together with the overtones, the basic tools for playing manifold and more complex rhythms. To start with, in all “D-exercises and rhythms” you can replace the “D” by a “G”, e.g. “Go Go go …”. Don’t expect any huge difference in sound. The “D” is merely a bit more percussive and the “G” a bit richer in overtones. Play everything through anyway and feel how the pressures change in the mouth. Where does the tongue touch the palate? Where does the air collect? What happens when you take a “K” instead of a “G”?
For “G” and “K” closure is done by the middle part of the tongue, with the tip down. Therein also lies the great advantage of the “G” or “K”. For some fast rhythms, you can use it in quick change with the “D”. It’s too early at this point to go more deeply into that but say “Dike Dike Dike…”. You’ll notice your tongue always stopping alternately in front (“D”) and in the middle (“K”), a movement you might compare with a see-saw. The two complement each other wonderfully and you’ll soon notice them preparing each other and handing over to each other. With just a bit of practice, it’ll come pearling out sweetly.
Copyright © 2003 Marc Miethe, Berlin (translated by Diet Simon)
Key to the characters
“blablabla” stands for any rhythmic vocalization line
(the rhythm words)
- blabla
- bla–bla–bla Minus signs stand for accented sounds,
- blablabla Without minus signs means connected, flowing together sounds, for example:
- blablabla
- blablabLA
Additional characters
- blablablablabla
1 + 2 + 3 + 4 + Counted beats (e.g. 4/4 time)
- blablablablabla
- blablabla
( )
- blablabla
- Embouchure O
- blablabla
| |
- blablabla
- Embouchure E
- blablabla
( |

